Replacing a Dirty Intake Element on MK6 GTI APR Carbonio Intake.

Step by Step Guide to Replacing Intake Filter Element on Mk6 GTI APR Carbonio Intake.

The APR Carbonio intake is an excellent aftermarket intake choice for the MK6 GTI. APR provides an MK6 owner the opportunity to increase airflow to their car in a simple, hassle free, long lasting and visually appealing way. From personal experience, I can say the APR Carbonio intake I purchased over 5years ago still retains its beautiful fit and finish. I have been able to service it with ease when needed and continues to live out its dusty, dirty and sometimes neglected life on my 12000mile a year daily commuter. – The Moover.

Tools Needed:

Torx T-20 screwdriver – Crescent CTD20V T-20 Torx Screwdriver, Red/Black

Flat head screwdriverCraftsman 9-47137 Slotted Screwdriver Set, 5 Piece

3MM Allen Tool – Eklind 21151 Metric 6pc Fold-Up Hex Key Set 3mm to 10mm

K&N Replacement Filter – K&N RU-2820 Universal Rubber Filter

(Use the links above to purchase the items needed)


Work Time: 10-20min

  1. Remove the (2) small T-20 Torx screws that attach the APR Carbonio intake to the OEM bumper inlet scoop. intakeoemvent
  1. Using a flat head screwdriver loosen the metal coupler located on the silicon fitting holding the APR Carbonio intake – make sure it is back off enough to allow room for removal on intake arm. intakeoemvent
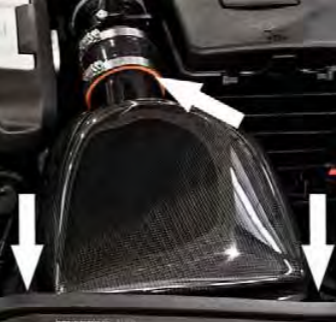
  1. Gently wiggle and pull the intake arm and MAF away giving enough room to slide the APR Carbonio intake from the silicon coupler. MAKE SURE TO CHECK THAT EVERTHING IS REMOVED – DON’T USE FORCE! Note: Be careful when pulling that you do not damage and wires connected to the MAF – There should be no reason to disconnect anything besides the metal coupler securing the arm of the intake.
  1. Once APR intake is removed from engine bay, place intake on a clean surface to avoid potentially damaging the beautiful finish of your APR intake. Note: At this time I like to use a microfiber cloth and some quick-detailer to wipe off the grit and grim that has accumulated on the APR intake
  1. Using a 3mm Allen tool – remove the (3) Allen screws connecting the inlet trumpet to the main plenum – Set screws aside in a safe space.intake3screws
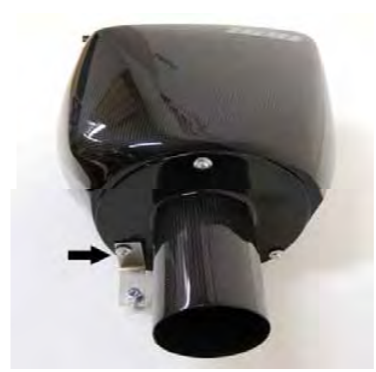
  1. Use a flathead screwdriver, loosen band clamp attaching filter element to APR intake arm. Be careful not to scratch. Remove dirty element and disgard or put aside for cleaning and re-oiling.inlet
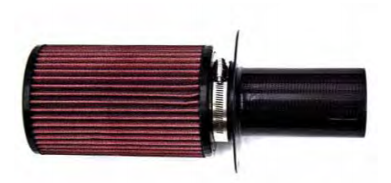
  1. Remove new filter element from packaging – loosen band clamp to allow enough room to slide on new filter element onto APR intake arm. NOTE: Spray hairspray onto a clean rag and wipe (lubricate) the inner silicon portion of filter element to aid you with the installation of filter element onto arm – only a small amount is needed.
  1. Tighten band clamp securing new filter element onto APR intake arm – DO NOT OVERTIGHTEN SNUG IS ENOUGH.
  1. Insert new filter element and intake arm assembly into APR air plenum match up the holes – carefully install the 3 allen head screws – DO NOT FORCE TIGHTEN TO SNUG.
  1. Inspect APR intake for proper reassembly – wipe clean.
  1. Reinstall intake by inserting intake arm into silicon housing – tighten band clamp to ensure placement
  1. Re-install (2) T-20 torx screws to OEM air Duct. NOTE: Install one t20 screw, then slide APR intake onto screw before installing second T-20 Torx.
  1. Tighten all fittings – inspect work – wipe down dirt – Start car.
  2. DRIVE!


NOTE: Variations in motor code and product revisions may require additional steps to remove APR intake – Please check APR installation PDF for further consultation. 


Up next: Steps (and helpful tips) to Replacing the Battery in your MK6 (MKVI) VW GTI.


Steps (and helpful tips) to Replacing the Battery in your MK6 (MKVI) VW GTI.

Featured

If you are living in the East Coast like me, you know how cold the temps have been. If your battery isn’t up to the task you might want to consider replacing your car battery before you are stuck without a jump. Here are the simple steps, and tips, to replacing that tired battery!

Tools needed:

13mm Socket SK Hand Tool 41709 6 Point Drive Deep Socket, 1/4-Inch, 13mm, Chrome

10mm Socket TEKTON 14115 1/4-Inch Drive by 10mm Shallow Socket, Cr-V, 6-Point

Socket wrench Stanley 91-928 1/4-Inch Drive Pear Head Quck Release Ratchet

Socket wrench extension Powerbuilt 640842 1/4-Inch Drive Extension Bar Set, 3-Piece

*If you would rather purchase an inexpensive socket wrench kit :Stanley STMT71648 40-Piece Socket Set


1.  Remove battery cover, the battery cover has a small tab in the front pull up. It is flimsy and will come off with ease.

battery cover

battery cover

2. Remove front battery tray. Push down on the front it should tilt towards you, pull up. Be mindful of the two clips in the front.

front of battery cover

front of battery cover pull down and and up towards you.

front of  battery cover

front of battery cover

Screen Shot 2015-01-10 at 1.24.50 PM

3. Using the 10mm Socket and wrench, Loosen the bolt holding the negative (black) Wire to the battery terminal. Remove black wire from battery terminal.

REMOVE NEGATIVE (BLACK) WIRE FIRST!!!

REMOVE NEGATIVE (BLACK) WIRE FIRST!!!

4. Using the 10mm Socket and wrench, loosen the bolt holding the positive wire (RED) to the terminal. Remove red wire from battery terminal

positive wire

positive wire

* Please be mindful of battery wires, place them away from each other and out of the way. please be mindful when working with electricity.

5. Using the 13 mm Socket and wrench, Remove the battery hold down and bolt. Place off the the side ( Please take note of the position of the battery hold down so that you familiarize yourself with how it holds down the battery) the battery hold down is located on the left side of the battery facing the engine. It is write by the MAF

Screen Shot 2015-01-10 at 1.28.25 PM

remove battery hold down

remove battery hold down

6. Remove battery. Take care not to damage or scratch paint or engine components.

remove battery and take off black sleeve

remove battery and take off black sleeve

7. Remove black battery insulating sleeve and replace it onto new battery. (take note of how it came off, there should be a cut out on the battery hold down side to accommodate the profusion on the battery for the hold down.

remove battery and take off black sleeve

black sleeve

8. Replace battery, and follow the steps listed above in reverse. Please remember to Install the Positive wire first, THEN the negative.  Ensure all bolts are tight. DRIVE!

If you are still unsure Please use this informative video as a reference! : https://www.youtube.com/watch?v=Yu_en9vlZeU

Notes:

When the car is started you will see new or unfamiliar lights displayed on your dash! NO WORRIES!!! simply drive the car of a speed of at least 10-12mph and those lights will turn off. The computer just needs to reset its parameters.

TIPS:
You do NOT need to reprogram the radio after. the code is built into the ecu and it will recognize the radio. However, what you might have to reprogram is listed below:

1.The convenience features (door locks, auto window, footwell lighting percentages) or any other item you have changed from factory.
2. The time (mine read AM instead of PM)
3. The drivers side auto window function
4. Your APR mode (stock, 91, 93, 100, etc) *this is variable but some people have reported that the ecu will default to the stock map.. NO WORRIES your tune is still there!!!! just play with he stalk and put it back into 93 or whatever you like

TO RESET THE AUTO ROLL DOWN ON THE WINDOWS,

1. Roll the windows up all the way.
2. Starting with the driver(or passenger) hold the roll down button until the window is fully rolled down
3. give the window switch button a quick double tap downwards quickly ( just like if you were pressing it to roll down the windows)
4. push the window button to roll the window up, proceed to roll the window up
5. once the window is fully rolled up, double tap the window button up quickly (just as if you were rolling the window up)

If done correctly, this will make the car relearn the upper and lower limits of the window. You should now be able to resume using your automatic roll down feature. I have done this when replacing my battery and it worked like a charm. with he MDI I could only get the passenger window to auto roll but doing this I was ale to get the driver and the passenger to work with ease.

Hope this has helped! BTW these instructions can also be found on the comment section of the youtube video linked to this post.


Up Next: Time to get rid of that dirty intake! Replacing a Dirty Intake Element on MK6 GTI APR Carbonio Intake.